NZ503 Improvements (04/3/13)
|
Corrects freezing while using Pandora |
Estimated Update Time: 15 minutes
Introduction
Please download and print this NZ503 Critical Software Update procedure prior to downloading and installing this software update. It is important that this procedure is done in the order described in this document as failure to do so may result in the NZ503 becoming inoperable.
Please confirm the software version of your unit prior to performing the update. Refer to step “3. Confirm Result” at the end of this document. If the software version on your device matches the versions listed in step “3. Confirm Result”, than your NZ503 is up to date and you do not need to perform the software update.
Warning: Do not perform this software update while operating the vehicle. Do not interrupt the power of the NZ503 while the update is in progress. Remember to record all the “Settings” prior to performing the update process as, after the update, the settings will be reset to the factory default.
Requirements
- A blank microSD with 256MByte or greater of memory.
- A microSD card reader for your PC.
1. Preparation
1. Download the "2013.02.28_NZ503_Latest_FW.zip" file and save it to your computers desktop.
D"2013.02.28_NZ503_Latest_FW.zip" file (About 33.8MByte)
When the file is unzipped, you will see one folder.
Folder:SW_Update
2. Update
1) Copy the one folder listed above to the blank microSD card.
2) Power off the NZ503 by turning off the vehicles ignition and remove the navigation microSD card that is currently inserted on the upper left hand side of the screen.
Note: The navigation map data is contained on the original navigation microSD card. Be careful not to misplace or damage the original navigation microSD card.
3) Insert the update microSD card into the microSD card slot, then power up the NZ503.
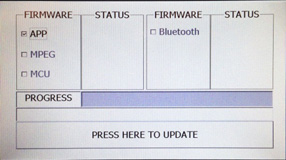
4) Touch the "PRESS HERE TO UPDATE" button. (Exp.1)
|
|
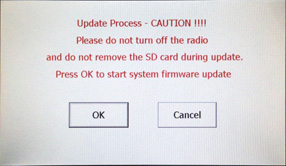
5) Touch the "OK" button. (Exp.2)
|
|
Note: Do not unplug, disconnect or power off the NZ503 until the update has been completed. This portion of the update will take about three minutes to complete.
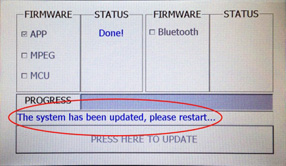
6) Once you see “The system has been updated, please restart…” (Exp.3) displayed on the screen, power off the NZ503 by turning off the vehicles ignition and remove the update microSD card that is currently inserted.
7) Insert the Navigation microSD card into the microSD card slot and power up the NZ503.
|
|
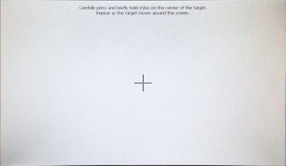
8) Follow the instructions on the screen to properly calibrate the touch screen. Be sure to carefully touch the crosshairs (+) with your finger tip or by using a touch screen stylus pen. (Exp. 4)
9) After you have completed the touch screen calibration steps, touch the screen in any location to exit the touch screen calibration mode.
|
|
3. Confirm Result
1) Press the “MENU” button that is located in the middle of the unit below the screen.
2) Press the “Setting” button (touch panel button that is located at the lower right side of the screen).
3) Scroll to the end of the “General” tab list.
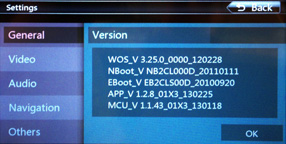
4) Press the “Version” button (Touch panel button).
5) Confirm that the following software versions have been successfully updated.
APP_V 1.2.8_01X3_130225
|
|
Important: If the software versions on your unit matches the ones listed above then your update has been successfully completed. If any of the software versions do not match, please perform the software update again.
Support / Contact Information
In the event you have any difficulties executing these instructions and/or need assistance, contact Clarion
Customer Service at (800)347-8667, option #2 (Monday-Friday, 7:00AM-5:00PM PST).
Return to the top of the page