"DO NOT use this update on NZ501, it is for NX501 ONLY!"
What the Update does:
| 1. |
Reduces the delay when switching to the reverse camera display |
You will need a blank microSD card that has a capacity of more than 128MB.
(You cannot use the 4G mapping microSD card that came with the NX501. If you do, it will void your warranty and you will need to purchase a replacement card.)
1. Download the "NX501OS.zip" file and save it to your computer.
Download "NX501OS.zip" file (About 13.4MB)
2. After the download is complete you will need to unzip the "NX501OS.zip" file using WinZip.
If you do not currently have winzip installed you can download it here. http://www.winzip.com/downwz.htm
3. A folder named "NX501OS" will be created after unzipping the" NX501OS.zip" file. Open the "NX501OS" folder and you will see six files in side. Copy the six files to the blank microSD card.
4. With the vehicle running, power the NX501 off by pressing and holding the Volume Knob until the NX501 shuts off.
5. With the NX501 powered off, carefully remove the 4G mapping microSD card from the NX501. Then insert the microSD card that contains the six files into the NX501.
6. Press the Volume Knob until the NX501 powers on.
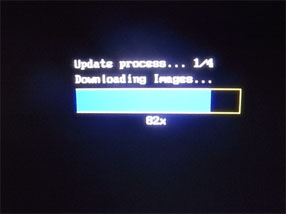
7. The update with start automatically.
|
|
Please do not unplug, disconnect or power off the NX501 until the update has been completed.
8. When the update has completed Clarion will be displayed on the screen.
|
|
9. Power off the NX501 by pressing and holding the Volume Knob until the NX501 powers down.
10. With the NX501 powered off, carefully remove the microSD card that contains the six files from the NX501. Then insert the 4G mapping microSD card back into the unit.
11. Power the NX501 on by pressing the Volume Knob until the NX501 powers on.
Confirming the Result
1. With the NX501 powered on, press the “MENU” button that is located at the top left corner of the NX501.
2. Press the “Setting” button (touch panel button that is located at the lower right side of the screen).
3. Scroll to the end of the “General” tab list.
4. Press the “Version” button (Touch panel button).
5. If the WOS_V version matches the number bellow then you have successfully updated your NX501.
WOS_V : 3.24.0_0000_110729
Return to the top of the page


 Support